Table of Contents
Introduction
I’ve been calculating roof areas for real buildings for over 20 years. Getting accurate roof measurements is important when you bill clients based on square footage, which we did for roof maintenance programs and roof condition assessments. Being able to measure a roof with Google Earth was a huge improvement.
Before Google Earth came along, measuring commercial roofs was a serious chore. You had to get up there with a measuring wheel and graph paper, and spend hours walking around measuring, figuring out angles, and drawing everything by hand. Google Earth was a fantastic improvement because it gives you a picture of the roof with accurate angles and lengths right off the bat, and all you need to do is field-verify a few sample measurements. I’ve been using it to measure roofs since 2006 (back when you had to pay for the Pro Version), so I’ve gotten pretty good at it.
You can measure your roof with Google Earth, if you know how to use it, in a couple of different ways. You can draw a line around the perimeter of your roof or any rooftop structure to get a usefully accurate (but not necessarily exact) area measurement. You can use the “ruler” tool to measure distances between two points as well as angles. So you can produce measurements for your roof and get a rough estimate for materials, etc.
This article explains the basics.
Some Notes Before We Start
If you just want to find and look at a satellite image of your house, see How to See a Satellite Image of Your House.
No, You Can’t See a Satellite View of Your Roof in Real Time
If you’re here wondering if you can see a real-time satellite image of your roof, the answer is “no, you can’t”. To do that, you would have to be able take control of the camera on a satellite, point it at your house and zoom in. Nobody has the capacity to let millions of random users control a camera on a satellite at the same time, which is what would be necessary for that. And they certainly wouldn’t let anyone use a satellite-based camera for free.
Google Earth works by compiling a massive database of satellite images which they combine to create a seamless collage that covers almost the entire globe in amazing detail. But the images they use are typically anywhere from a few weeks to a few years old.
There is currently no official guidance from Google about the average age of the images used in Google Earth, but there are a lot of websites claiming the average image is 1 to 3 years old. I believe they all got that figure from an old post on the Google Earth blog that has since been deleted.
You can usually see the date of the image in your current viewing window on the right side of the bottom of the Google Earth image field. If you don’t see it, try zooming in. The “imagery date” (image capture date) should appear once you’re close enough. You can also turn on “historical imagery” to compare satellite images taken at different times.
Anyway, if you’re going to measure a roof using satellite images, you should try to be sure the roof hasn’t been altered recently.
Satellite Measurements: Flat Roofs vs. Pitched Roofs
Keep in mind that measuring roofs with satellite pictures is only reliably accurate for low-slope or “flat” roofs. Satellite imagery cannot account for the additional surface area created by roof pitch. A pitched roof has more actual surface area than the footprint, or plan view area, that it covers, and satellite pictures won’t capture that difference.
Satellites look almost straight down from above. They can’t see the angle of the roof, and they don’t know whether it’s flat or steep. A very steep roof can have double the surface area of a flat roof with the same footprint. And satellite images will not help you determine the pitch of a roof.
If you need to measure the area of a pitched roof, you can use Google Earth to get the footprint area, but for the additional surface area due to roof slope, see my Gable Roof Calculator page or Hip Roof Calculator page for help (or see Construction Calculators for other roof shapes).
Even so-called “flat” roofs should have some minimal mandatory slope for drainage. Once you’ve measured the footprint area, you may want to apply a low-slope roof pitch multiplier to get an even more accurate surface area.
Ok, enough of that, here’s how you measure a roof with Google Earth:
1. Download and Install Google Earth
Before you can measure a roof with Google Earth, you’ll need to download and install Google Earth Pro. Google Earth Pro used to be the paid version (it cost $400 per year about 15 years ago) but it’s free now.
You can download it from the Google Earth Versions page here.
It includes several advanced tools that weren’t available in the basic version. The most important tool for measuring roofs is the polygon measurement tool, which allows you to measure the area of a defined shape on the map.
2. Open Google Earth
Once you’ve installed Google Earth Pro, open it. You’ll see an image of the Earth along with various menus and tools around the edge of the screen:

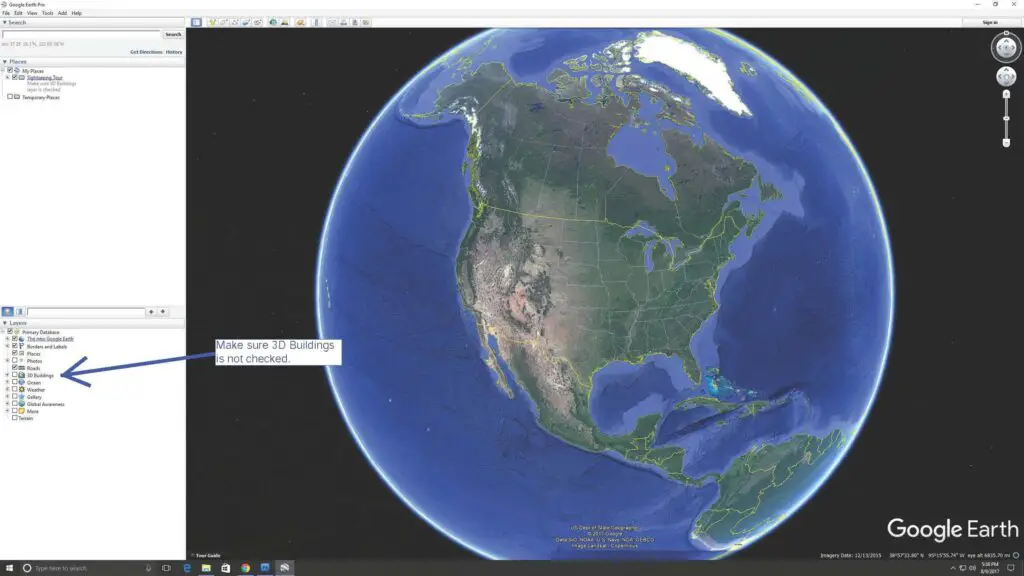
3. Uncheck “3D Buildings” Box
The first thing you want to do is make sure the box for “3D Buildings” is NOT checked. When you’re trying to use the measurement tools in Google Earth, having the 3D Buildings mode turned on can interfere with your measurements.
The 3D Buildings option is located under the “Layers” menu on the bottom of the right side of your screen:
4. Search for the Address of the Building
At the top left of the screen, you’ll see a search field. Enter the address of the building you want to measure in the search field and click on “Search”:
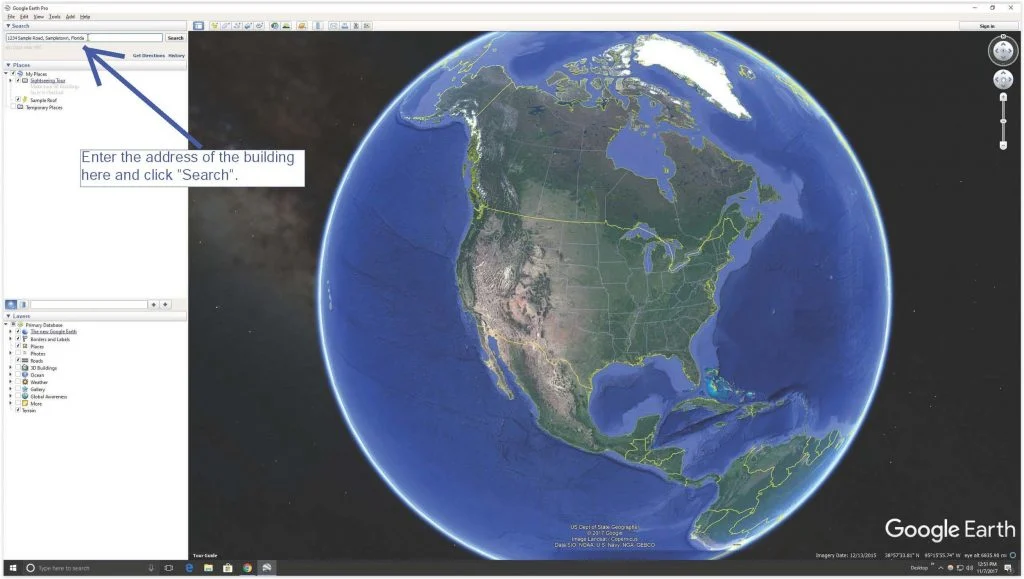
This will put a pin on the address location and the image field will zoom to the location and center itself on the pin so that you can see the roof you want to measure (the pin is the yellow thing in the middle of the picture below, but the pins seem to all be orange now):
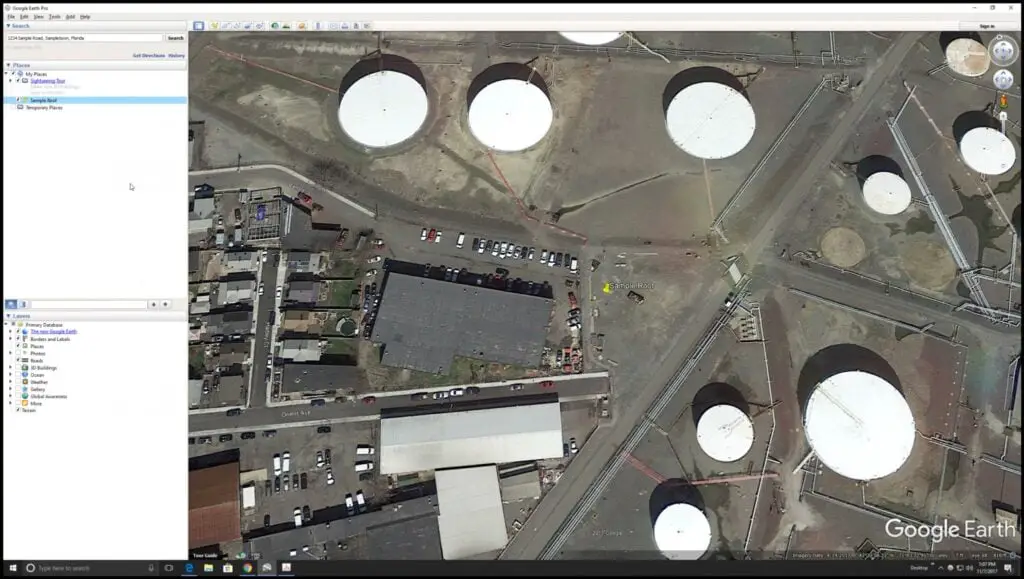
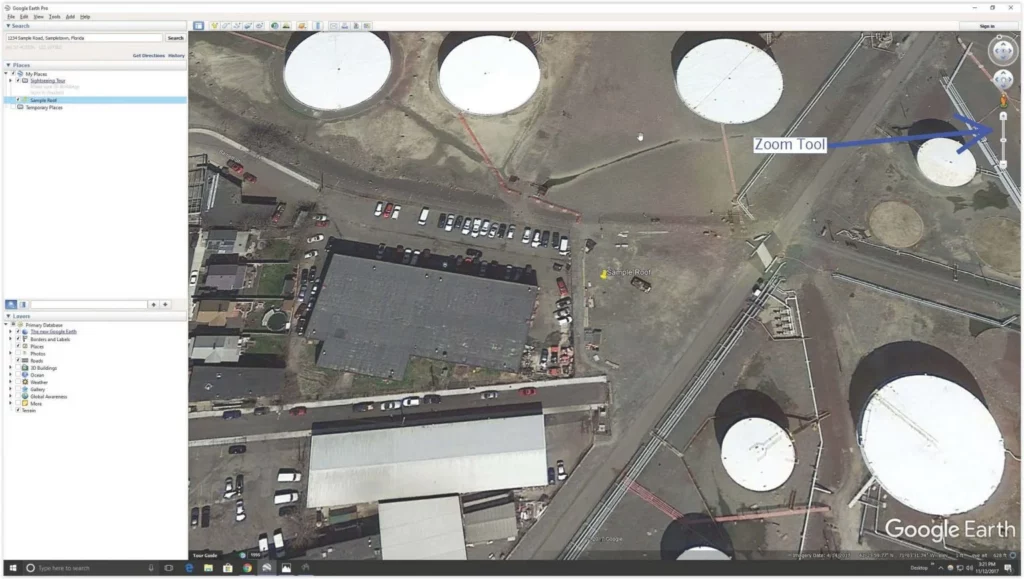
5. Zoom in on the Roof
At this stage, the “eye altitude” shown in the bottom right corner of the screen is still fairly high. To measure a large roof as accurately as possible, you’ll need to zoom in until the roof fills as much of the image field as possible without parts of it going out of the viewport. Don’t do this with smaller roofs, or you’ll flip to street view. For smaller roofs, just try to zoom in so you get to the point just before the image switches to street view.
There are two ways to zoom in:
- Use the slider in the top right corner of the image field, or
- Scroll with your mouse wheel (just make sure your cursor is positioned inside the image field when you do).
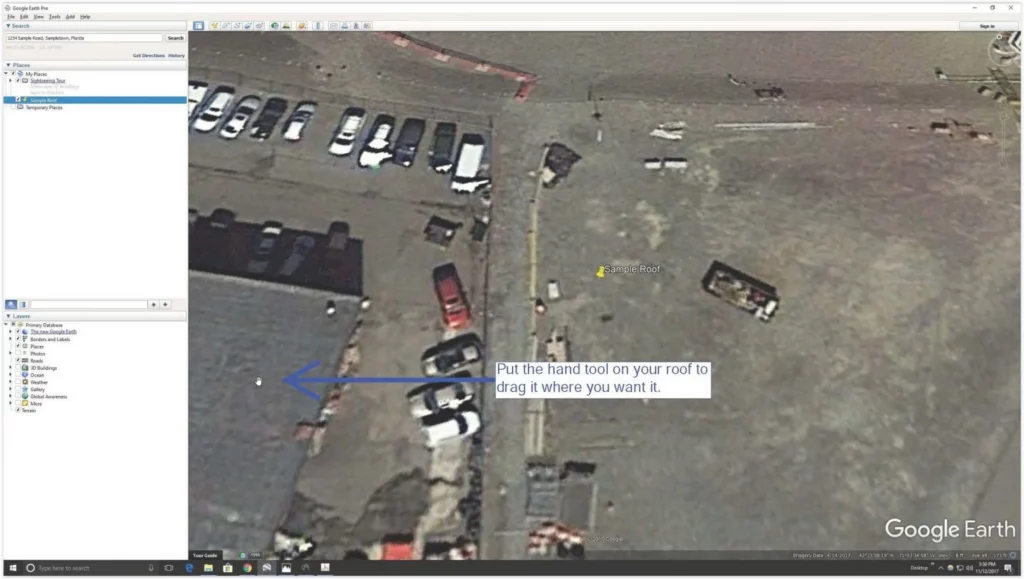
6. Center the Roof
To do this right, you should have the entire roof visible and centered in the Google Earth image field.
To make sure the image field stays centered on your roof, put the cursor (looks like a little hand) on your roof and hold down your left mouse button. This hand tool lets you grab the image at that spot and drag the roof to the center of the image field:
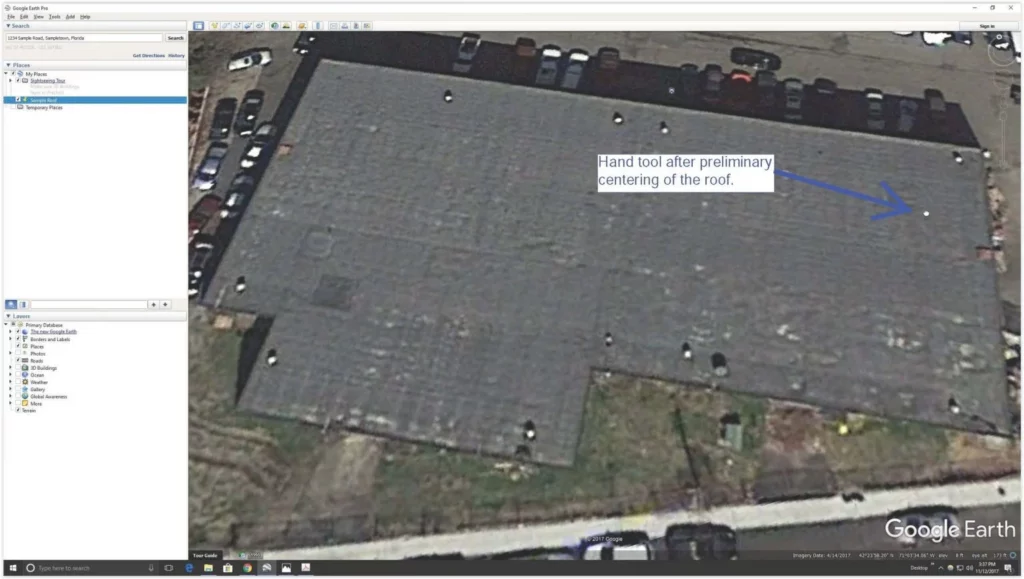
7. Rotate the Roof
You want the roof to fill up as much of the image field as possible, as this makes it easier to measure the roof and makes your measurements more accurate. Start by rotating the roof using the rotate tool in the top right corner of the image field.
Put the cursor on the “N” (for “North”), hold down the left mouse button, and move the “N” around the little circle to rotate the image.
It usually works out best if you line up the longest edge of the roof so that it’s parallel with the top and bottom edges of the image field.
Note: The rotate tool might not appear in the top right corner of the image field for you at first. If this is the case, in the menu bar on the top left, click on “View”, then click “Show Navigation”, then check the box for “Automatically”.

8. Reset the Viewing Angle
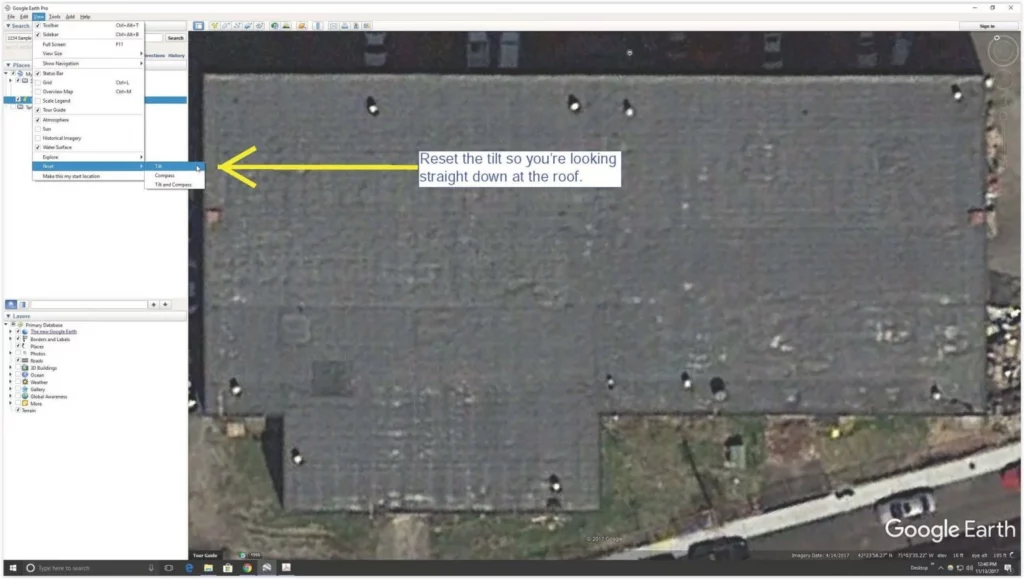
Keep rotating, zooming, and centering the image until you’re satisfied. At this point, the image will most likely be tilted so that it looks like you’re viewing the roof at an angle, which can be irritating. This can be fixed with the “Reset” tool.
At the top left, click on “View”. This opens a drop-down menu. At the bottom of this drop-down menu, click on “Reset”. This will open up another little menu. Click on “Tilt”, and your view of the roof will once again be from straight above.
Do not reset “Compass” or “Tilt and Compass”, or you’ll undo all the rotating you just did.
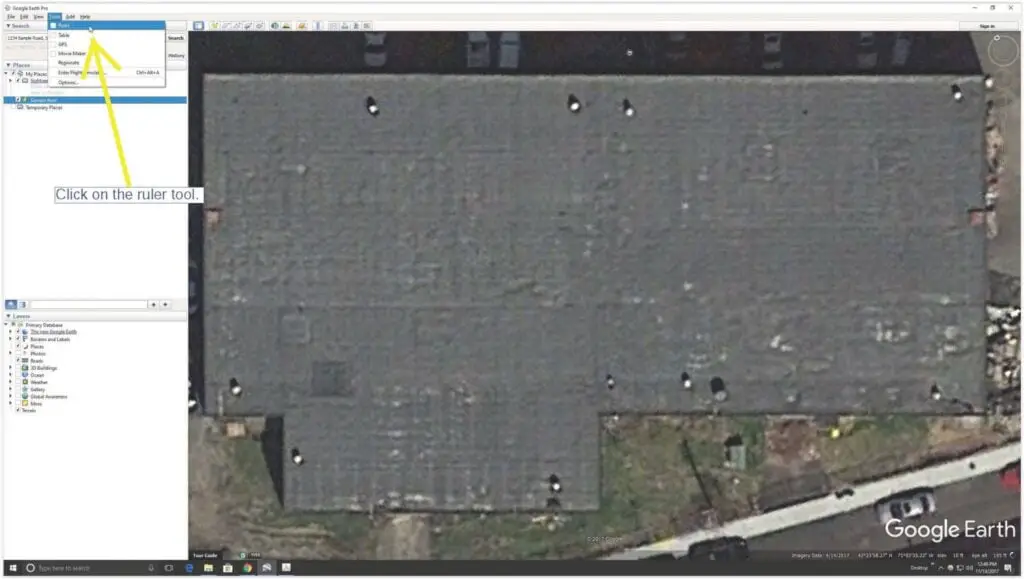
9. Select Your Measuring Tools
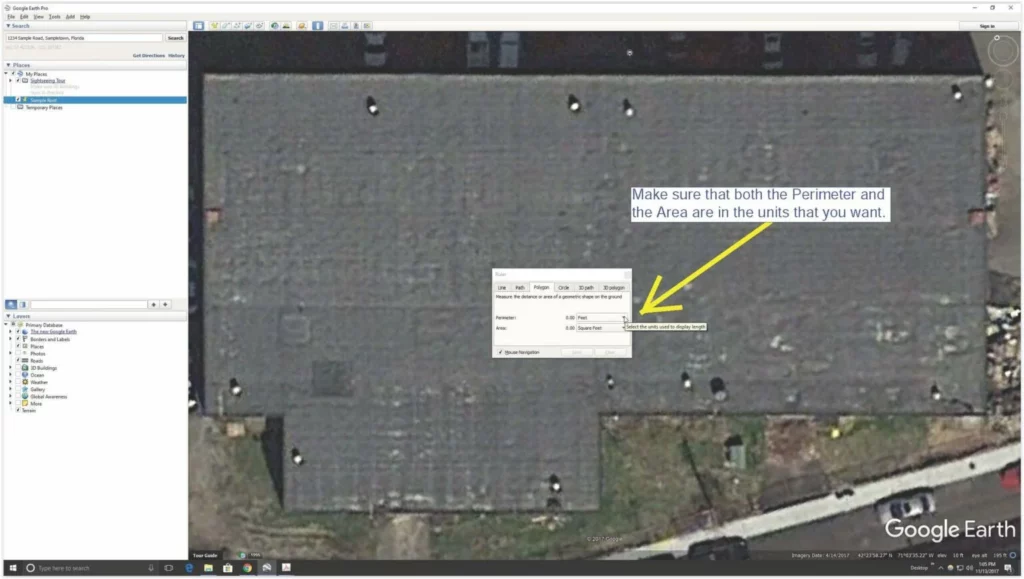
Now you’re ready to actually start measuring the roof. At the top left, click on “Tools”. In the drop-down menu, check the box next to “Ruler”. This opens a box with a little menu across the top. Click on “Polygon”.
The default unit of measurement should be “feet” and “square feet”. If it isn’t, or if it is but you want a different unit, you can change it by clicking on the little unit fields there. (They include “Smoots” as a unit option. I get a kick out of that, my great-grandmother was a Smoot.)

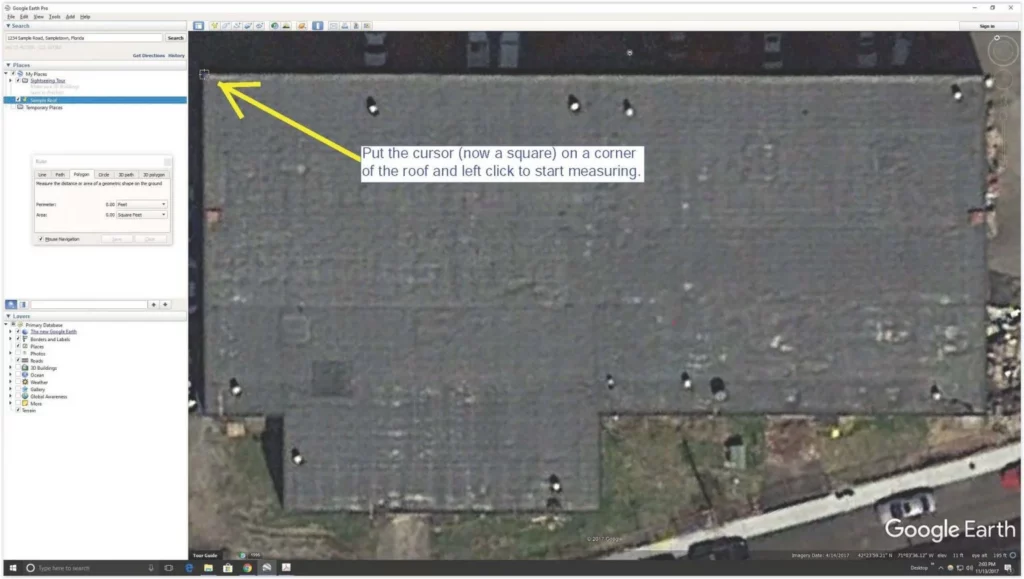
10. Move the Box out of the Viewing Field
Put your cursor in the top area of the little box, hold down the left mouse button, and drag it out of the image field. Do not close the ruler box.

11. Measure a Roof: Pick Your First Roof Corner
Your cursor is now a little square. Center the square on a corner of the roof and left click your mouse. This puts a little dot on that corner of the roof.
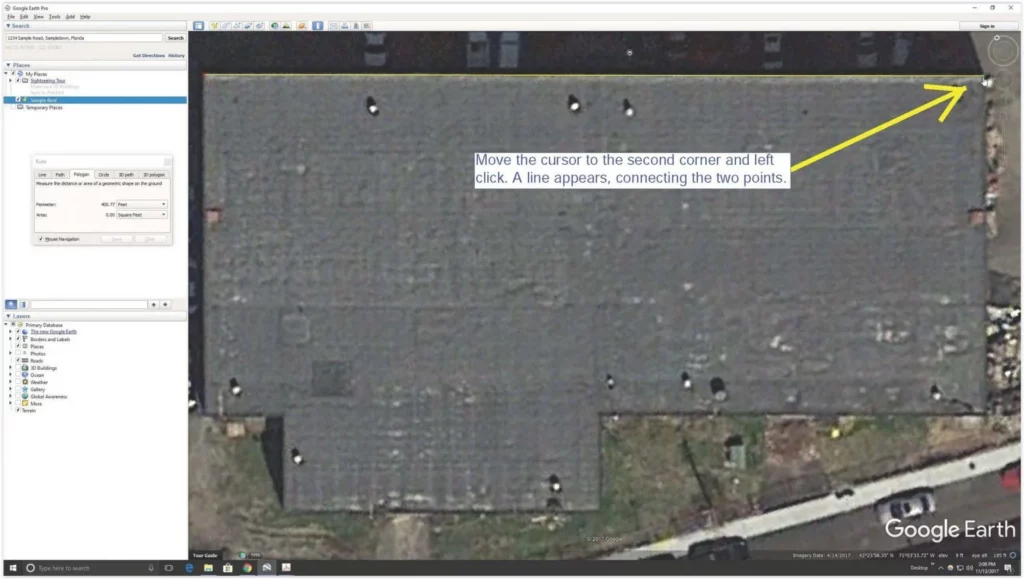
12. Move to the Next Corner
Move to the next corner of the roof and left click.
A line should appear, connecting the two corners. In the little measuring tools box that you moved, the measured length of the line should appear in the Perimeter row.
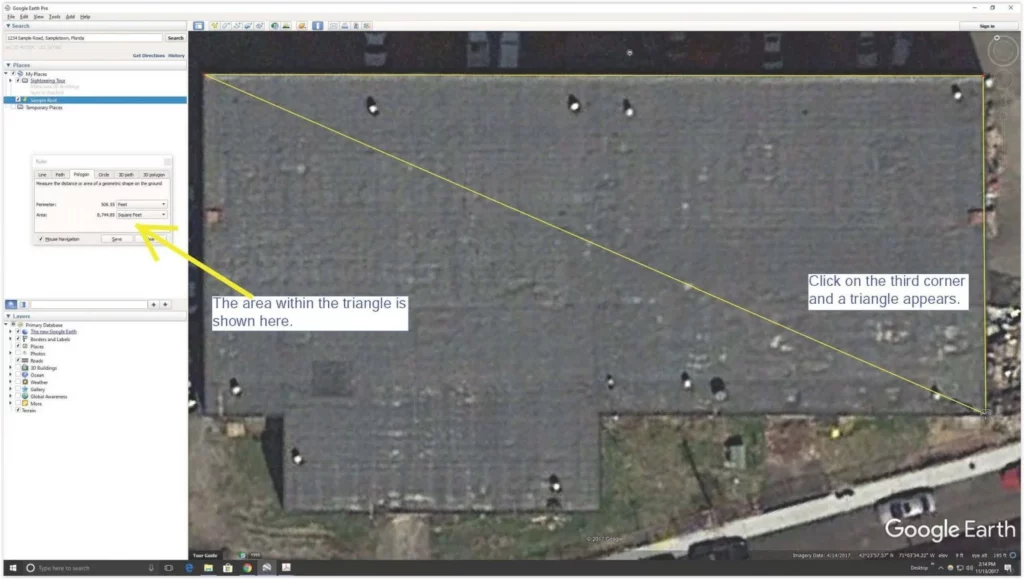
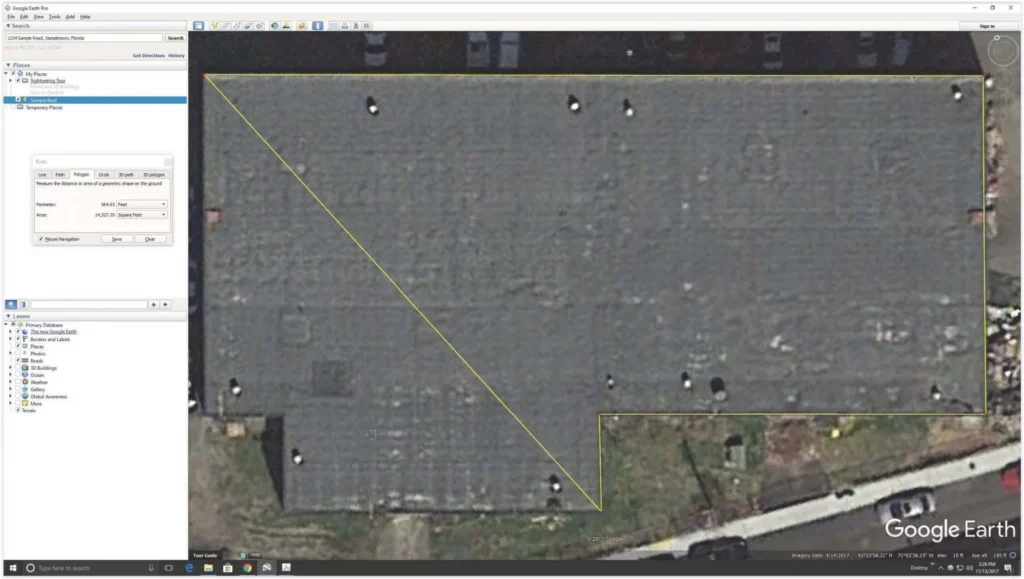
13. Move to the Third Corner
Click on the next corner of the roof. Now you should see a triangle formed by the three corners. The area of the triangle should appear in the Area row in the measurement box.
14. Finish Clicking on All the Roof Corners
Continue clicking on the corners of the roof until the lines cover the entire roof perimeter. You must carefully go around the roof in order, or your line will get messed up and you’ll have to start over.
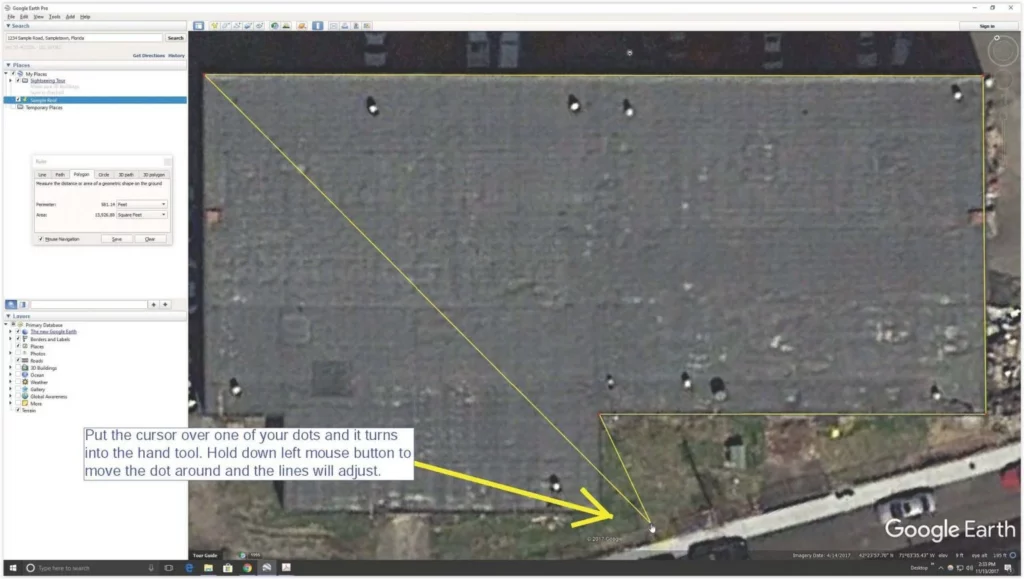
15. Did You Click on the Wrong Spot?
If you click on a corner but the dot for that anchor point is not exactly where you wanted it, you can fix this. Hover the cursor (little reticulated box) over the problem dot, and the cursor will turn back into a hand.
Hold down the left mouse button, and you can drag the dot anywhere you want. Drag it to where you want it and release the mouse button. The lines for your perimeter will adjust themselves.
16. Notes on Adjusting Your Lines
You can remove the anchor point for an angle in your perimeter and get rid of that corner altogether. If you right click on a dot, it will disappear, and the lines will adjust themselves accordingly, removing that angle.
You can also add a dot anywhere you want by clicking in the image field, and the lines will adjust to it, including the new angle in your perimeter.
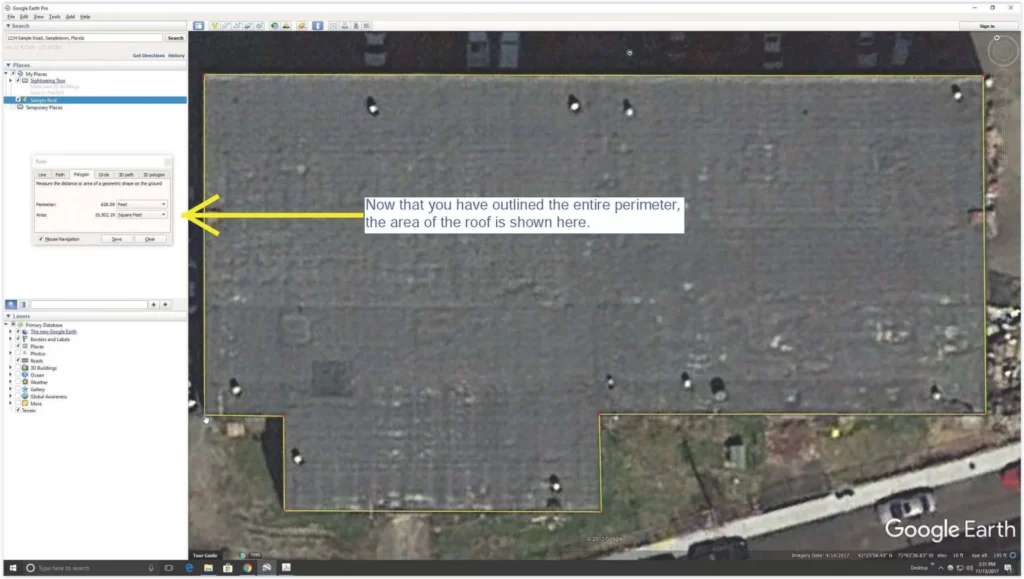
17. Find the Area of the Roof
Now that you’ve gone around the entire perimeter of the roof, look at the ruler box, and you’ll see the total area of the roof in the Area row in the measurement box.
18. Done
There you go, now you know how to measure a roof with Google Earth.

About the Author
Jack Gray spent 20 years as a principal roof consultant with the Moriarty Corporation, an award-winning building enclosure consultant firm founded in 1967. Mr. Gray has worked in the roofing industry for over 25 years, with training and practical experience in roof installation, roof inspection, roof safety, roof condition assessment, construction estimating, roof design & specification, quality assurance, roof maintenance & repair, and roof asset management. He was awarded the Registered Roof Observer (RRO) professional credential in 2009. He also served as an infantry paratrooper in the 82nd Airborne Division and has a B.A. from Cornell University.