I participate in the Amazon affiliate program and may earn commissions from purchases made through links on this page.
Table of Contents
What are Roof Nail Pops?
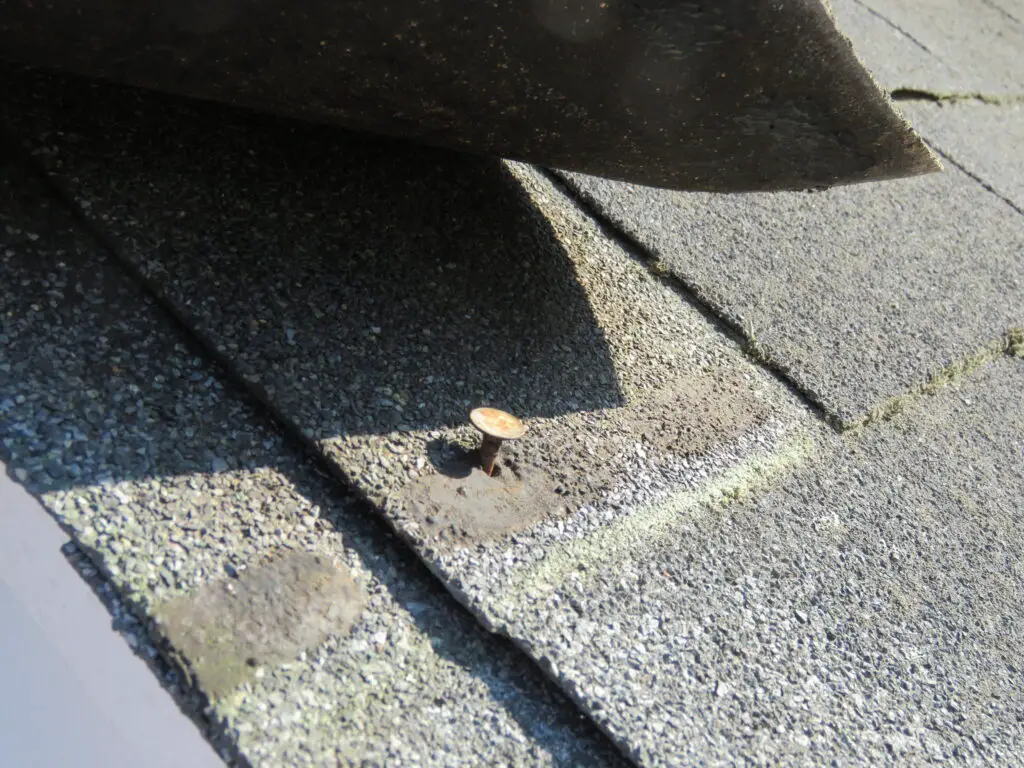
Roof nail pops, also called “backed-out nails,” are a type of roof defect where the roofing nails which secure the shingles have been forced back and out of the roof sheathing due to cyclical changes in the pressure exerted on the nail by the surrounding wood. It can look like shingles popping up on the roof. This issue is not only unsightly but can also compromise the overall integrity of the roofing system, potentially leading to leaks and further structural damage if left unaddressed.
Wood roof sheathing (plywood, OSB, wood plank) swells due to increased humidity and high temperatures. When it cools and dries out, it contracts. Repetitions of this process place stress on fasteners and reduce the ability of the wood to hold the nail. The severity of this effect is influenced by the quality of the sheathing material. OSB, for example, tends to expand and contract more than plywood, increasing the likelihood of nail pops over time.
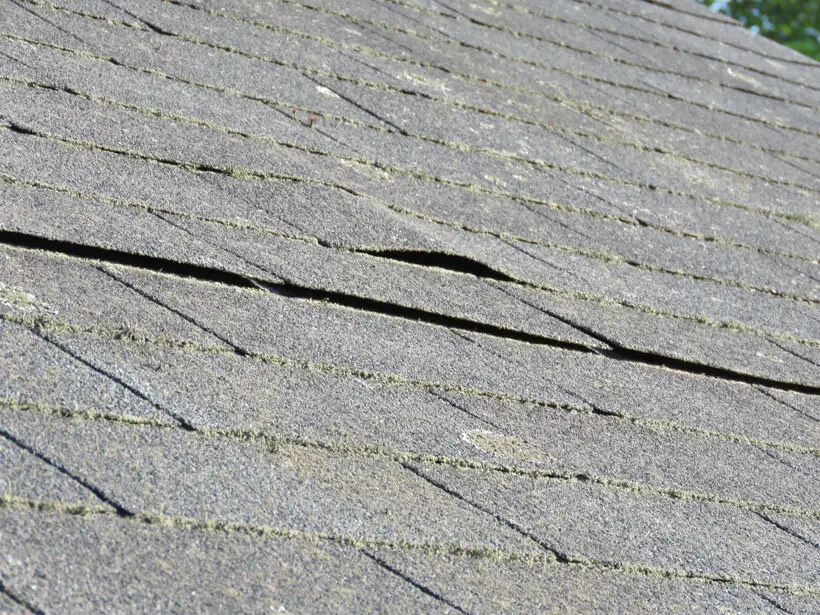
As the nail loosens, every time the wood swells it pushes the nail out of the hole a little bit more. Eventually, this leads to visible roof nail pops, with lifted or punctured asphalt roof shingles. Shingles that lift due to nail pops are particularly vulnerable to wind damage, as they are no longer fully secured to the roof deck. If a strong wind catches a raised shingle, it can tear off completely, exposing the underlayment and sheathing to the elements.
Roof nail pops tend to be a common issue on roofs with poorly ventilated attics, where extreme overheating of the roof occurs. Inadequate attic ventilation can cause excessive heat buildup, which accelerates the expansion and contraction of roof decking materials. This continuous movement weakens the nails’ grip and contributes to widespread nail pops.
Roof nail pops can also be an issue for shingles that were installed while the roof sheathing was not dry at the time of installation. Wet wood typically means swollen wood. Nailing into damp wood prevents the nails from being properly held in place by the wood right from the start. This is why industry best practices include checking moisture levels in roof sheathing before installation, as nailing into damp wood can result in premature failure of the roofing fasteners.
Another situation where roof nail pops are common is on roofs where a second layer of shingles has been installed over an existing roof. In this case, a common issue is the use of roofing nails that are too short to properly penetrate the sheathing. Even when longer nails are used, the presence of multiple roofing layers can reduce the holding power of the fasteners, as they must penetrate through more material before reaching the sheathing. This can make nail pops even more frequent in the case of a roof “recover”.
Nails that do not fully penetrate the sheathing and visibly extend around 1/4-inch beyond the bottom surface of any sheathing that is less than 3/4 inch thick are particularly susceptible to backing-out, partly due to the shape of the nail. If the tapered section at the end of the nail shank ends up embedded in the sheathing instead of penetrating all the way through and out the other side, you can expect problems.
Another thing to be aware of is that smooth-shank nails are more prone to working loose over time compared to ring-shank or screw-shank nails, which have greater resistance to withdrawal forces. Choosing the correct nail type and ensuring proper penetration depth will help prevent roof nail pops.
The Building Code and Roofing Nails
The following is from the 2021 International Building Code section covering asphalt shingles:
“1507.2.5 Fasteners
Fasteners for asphalt shingles shall be galvanized, stainless steel, aluminum or copper roofing nails, minimum 12-gage [0.105 inch (2.67 mm)] shank with a minimum 3/8-inch-diameter (9.5 mm) head, of a length to penetrate through the roofing materials and not less than 3/4 inch (19.1 mm) into the roof sheathing. Where the roof sheathing is less than 3/4 inch (19.1 mm) thick, the nails shall penetrate through the sheathing. Fasteners shall comply with ASTM F1667.”
This language is partly intended to prevent roof nail pops. Note that 3/4-inch is very thick for roof sheathing, and you probably won’t see sheathing this thick on any house built in the last few decades where asphalt shingles were the intended roofing material. Most modern residential construction uses roof sheathing that is 7/16-inch or 1/2-inch thick, with 5/8-inch sheathing being more common in areas subject to higher wind or snow loads. Roofs designed for heavier roof coverings, like tile or slate, will typically have thicker sheathing.
If your roof sheathing is less than 3/4-inch thick (and it probably is) and you don’t see the tips of the roofing nails coming through the underside of the sheathing panels, not only are you more likely to develop roof nail pops, but you might actually have a code violation on your hands, depending on when the house was built. Building inspectors commonly check for nail penetration during roof installations, and failure to meet this requirement could result in a failed inspection or the need for corrective work.
Another important aspect of roofing nail compliance is the material and coating of the fasteners. The code requires galvanized, stainless steel, aluminum, or copper nails because they resist corrosion. In coastal regions or areas with high humidity, corrosion resistance is a critical concern, as rust can weaken the hold of the nails over time and lead to more frequent nail pops.
The length of the nail is also important. Nails should be long enough to penetrate at least 3/4 inch into thick sheathing (sheathing thicker than 5/8 inch will typically be wood plank decking) or visibly extend 1/4 inch beyond the underside of thinner sheathing (sheathing less than 3/4 inch thick. In reroofing situations where a second layer of shingles is installed over an existing roof, longer nails are required to account for the added thickness. If shorter nails are used, they may not provide sufficient grip, leading to premature loosening and increased susceptibility to wind uplift.
While the International Building Code (IBC) provides minimum requirements, local building codes may impose stricter standards depending on climate conditions, wind zones, and historical performance issues in the region. Checking with local building authorities before installation can help ensure compliance and prevent costly mistakes.
Why are Roof Nail Pops a Problem?
Roof nail pops are unattractive, for one thing. Your roof will have bumps and humps and out-of-place shadows. So, roof nail pops are an aesthetic issue.
The more serious issues with roof nail pops are performance-related. By forcing the shingles up, they create a pathway for wind-driven rain to reach the roof sheathing and to enter your house as a roof leak. Even minor water intrusion can lead to mold growth, wood rot, and insulation damage, compounding the issue over time. Left unaddressed, this can shorten the lifespan of your roofing system and lead to costly interior repairs.
By forcing the shingles up, the backed-out nails break the bond between shingles created by the shingles’ self-sealing strip or any added roof cement. This will greatly increase the chance of wind damage to your roof. Wind agitation of the shingles can lead to cracked, torn, or broken shingles, and probably punctures at the location of the roof nail pops themselves.
Once a nail pop lifts a shingle, it also creates an entry point for debris, pests, and ice formation in colder climates. Ice accumulation around the raised nail can further force it out, exacerbating the problem and making the shingle even more vulnerable to wind uplift.
If the bond between the shingles is particularly strong and can resist this pressure from below, the nail heads will simply puncture the shingle, giving rain a direct path into your house, through the hole in the shingle and down the nail hole underneath it. This type of puncture damage can be especially problematic because it is often not immediately visible, leading to leaks that go undetected until significant interior damage has occurred. Over time, repeated water infiltration through these small openings can cause the roof decking to weaken, making future roofing repairs more difficult and expensive.
How to Repair Roof Nail Pops: Tools and Materials
Always follow roofing safety guidelines when working on a roof.
Tools
- Flat Bar – See on Amazon
- Hammer – See on Amazon
- Trowel – See on Amazon or Caulk Gun – See on Amazon
Materials
- Roof Cement, Trowel-Applied – See on Amazon or Roof Cement, Caulk Gun-Applied – See on Amazon
- Roofing Nails – See on Amazon
How to Repair Roof Nail Pops: Step by Step
Always follow roofing safety guidelines when working on a roof.
CAUTION: Never attempt repairs during high winds, wet conditions, or extreme cold. Wet surfaces are slippery, and shingles are prone to cracking in cold temperatures.
CAUTION: If you notice multiple nail pops in a concentrated area, this may indicate underlying issues such as inadequate attic ventilation, improper nail length, or deck movement. In such cases, further investigation is needed to prevent recurring problems.
CAUTION: Do not over-lift the existing in-place shingles. Repairs on asphalt shingle roofs are best done when the temperature is warm enough so the shingles can soften somewhat, so you can work with the shingles without cracking or breaking them. The ideal temperature for shingle repairs is between 60°F and 80°F.
1. Lift the existing shingle right above the area where the nails are backing out. If the shingle is particularly stiff or brittle, you could try using a heat gun on a low setting or let the sun soften it naturally before lifting it to avoid breakage.
2. If the nail is bent, rusted, or too loose to stay firmly in place, remove it completely. Use a new #11 or #12 aluminum, copper, or galvanized steel barbed ring shank roofing nail with 3/8-inch to 7/8-inch diameter heads. Ring shank nails offer better holding power than smooth-shank nails and significantly reduce the risk of future nail pops.
Note: Replacing the nail is preferred over re-driving the nail. If the shingle covering the backed-out nail can be raised enough (without cracking it) for you to use a hammer directly on the backed-out nail, you can re-drive the nail with a hammer directly to the nail head.
If the shingle covering the nail cannot be raised enough to expose the nail head so a hammer can be used, use a flat bar. Place the end of the flat bar on top of the nail head and tap the bar with a hammer to re-drive the nail back into the deck. You will use the flat bar in a similar manner as you would use a nailset. You should drive the nail in far enough so that the nail head is flush with the surface of the shingle. Do not damage the shingle by over-driving the nail in past the surface of the shingle.
New nails should be long enough to penetrate into wood plank decks at least 1 inch or go completely through plywood or OSB decks. If you have OSB sheathing, be sure the nails extend at least 3/8-inch beyond the bottom surface to ensure a strong grip. Drive the new nail into the shingle in a new location about an inch above the old location. Do not drive the new nail into the old nail hole.
3. After you’ve installed the new nails or re-driven the old nails, cover the nail heads with a 1-inch wide spot application of industrial-grade, asbestos-free roof cement. Be sure to use a high-quality roof cement that remains flexible over time, as brittle cement can crack and allow water to seep in. If you’ve replaced the nails, be sure to apply a similar spot of roof cement to the old nail holes as well.
4. At this point you should note that the bond between the shingle you lifted and the adhesive strip on the shingle below it (where the nail pop was) has now been broken because of the nail pop(s) and your work repairing them. This is bad, because that bond is very important for preventing wind damage. You need to remedy this with spot applications of roof cement.
Apply spot applications of roofing cement (similar to above) to the underside of the tab of the lifted shingle, which will sit on top of the shingle where the nail pops were. Five spots, one in each corner and the other three spaced evenly across the bottom of the shingle. All spots of roof cement should be applied back about one inch from the edge(s) of the shingle you’re applying it to so it doesn’t ooze out and become visible when you press the shingle down.
5. Lower the lifted shingle back down onto the shingle beneath it, firmly pressing the shingle tabs into the roof cement to adhere the shingle tabs. To ensure a strong bond, you can place a weighted object (such as a brick wrapped in cloth) on top of the repaired area for an hour to allow the adhesive to set properly.
6. After completing the repair, inspect the surrounding area for additional nail pops, as one usually indicates a broader issue. If multiple nail pops are present, consider a full roof inspection to prevent future leaks and damage.
7. Finished! Always check your repair after the next heavy rain or windstorm to ensure everything remains secure.

About the Author
Jack Gray spent 20 years as a principal roof consultant with the Moriarty Corporation, an award-winning building enclosure consultant firm founded in 1967. Mr. Gray has worked in the roofing industry for over 25 years, with training and practical experience in roof installation, roof inspection, roof safety, roof condition assessment, construction estimating, roof design & specification, quality assurance, roof maintenance & repair, and roof asset management. He was awarded the Registered Roof Observer (RRO) professional credential in 2009. He also served as an infantry paratrooper in the 82nd Airborne Division and has a B.A. from Cornell University.