I participate in the Amazon affiliate program and may earn commissions from purchases made through links on this page.
Table of Contents
Tilt-Up Construction Overview
Tilt-up construction is a building method where large reinforced structural concrete panels are cast on site, then tilted up vertically and secured to form the building’s walls. Although the first documented use of the tilt-up construction method occurred in 1908, it wasn’t until the post-WWII economic boom in America that it became common. People needed warehouses, and they needed them quick.
Today, tilt-up wall construction is used for almost every big-box store, warehouse, distribution center, low-rise office building, etc. built in the United States.
If you are a property manager, you are likely responsible for at least one building that was built using tilt-up walls.
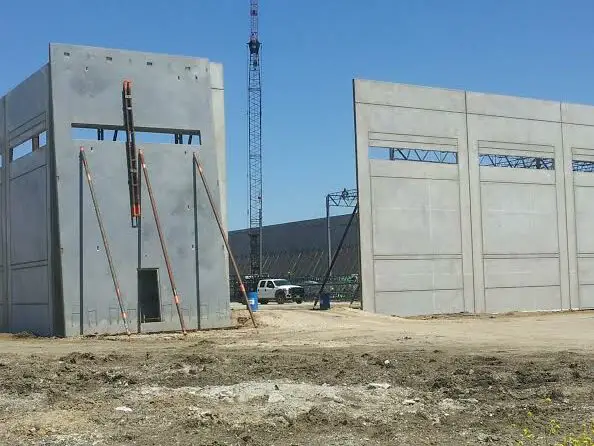
Tilt-up wall construction is simple, cheap, and fast. This is why it is so popular. Slabs of concrete, which will become the load-bearing exterior walls of the building, are formed horizontally on the ground at the construction site. Reinforcing steel is arranged within the concrete forms, with spaces for windows, vents, roof scuppers, etc. blocked off and formed at the same time as the wall panel.
The concrete is then poured in and allowed to cure. This usually takes about a week, but it can take longer for the panels to reach the required strength depending on the weather. Cold or damp weather slows down the process.
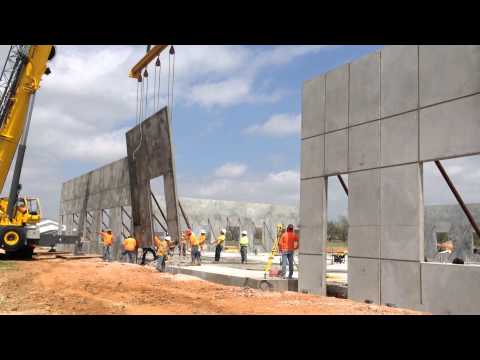
The most common height for a tilt-wall panel is around 30 feet, although they can be produced with heights of up to 90 feet or even a little more for special construction applications. Once they are ready, these concrete panels are then lifted (tilted up) with a crane. The crane is used to place the panels into position on top of concrete footings. Each wall of the building is created by placing a series of tilt-up panels in a line.
After the panels are placed, they are held in place by temporary supports while the panels are connected to each other and the foundation, and while the roof structure is built.
This short video by BiLD Architects shows a tilt-up wall panel being lifted and positioned:
The roof structure consists of a supporting system that uses some combination of steel trusses, rafters, purlins, or joists, as well as the roof deck. The roof structure is typically supported by interior columns, and it is connected to the tilt-up wall system via ledgers (horizontal support pieces) that are bolted or welded to steel anchors embedded in the tilt-up panels at the time they were cast on the ground. The roof structure ties all of the walls together and is vital to the stability of the finished building.
The tilt-up concrete walls on commercial buildings are usually finished with an exterior application of roughcast, EIFS, or other cladding system.
Roofs on Buildings with Tilt-up Walls
The underlying roof structure on a tilt-up building is usually installed at a slight angle so that it produces the slope required for proper drainage of the finished roof. The slope of the roof structure will typically be anywhere from a quarter inch per foot to 2 inches per foot.
This built-in slope allows for a simpler roof system. The roof can be installed directly over the roof deck without having to design for roof drainage using complicated and expensive tapered insulation layouts. The roof deck will usually (but not always) be corrugated steel.
You can still find many built-up roofs in place on older tilt-wall buildings, but virtually all new buildings using tilt-up construction today will have a single-ply membrane system. These single-ply roof membranes will almost always be TPO (most common), EPDM (very common), or flexible PVC (less common).
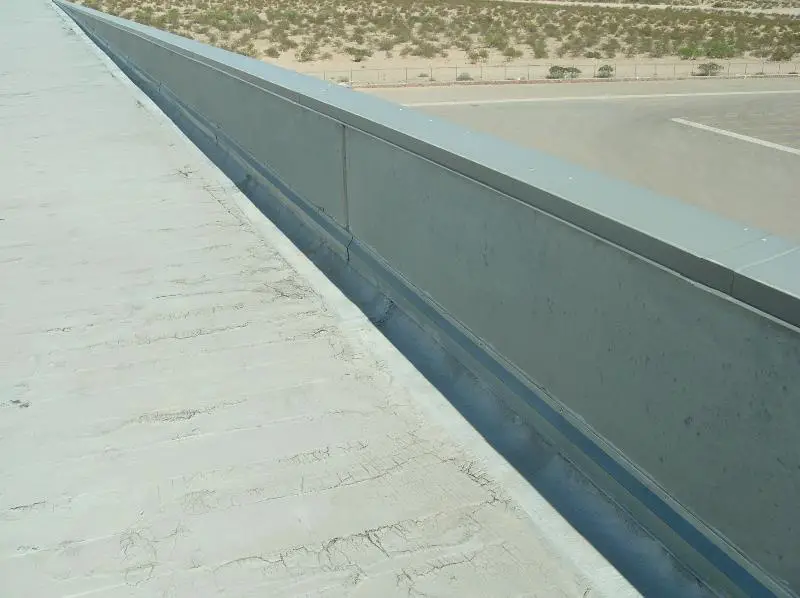
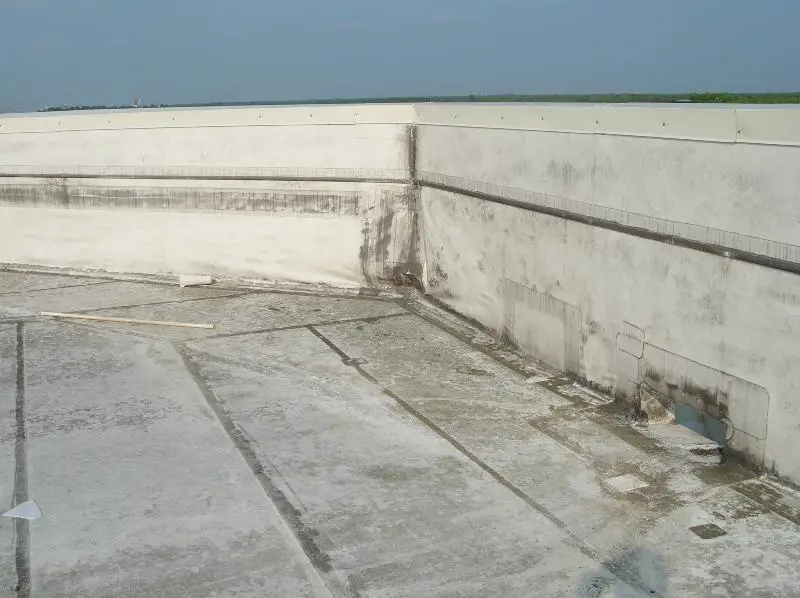
In keeping with the “cheap and fast” theme of tilt-wall construction, the roof parapet walls on these buildings are simply the tops of the tilt-up wall panels, and the roof termination at the parapet wall is usually as simple as possible.
Parapet Wall Base Flashing Details
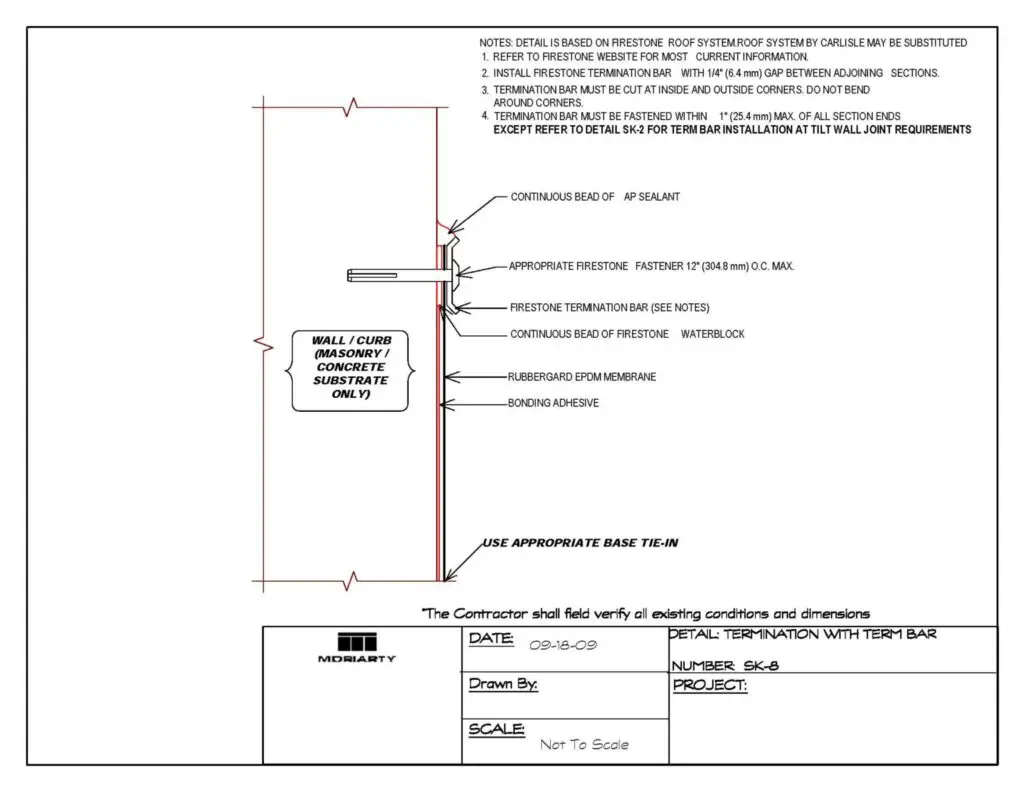
Separate perimeter flashing components, using membrane flashing material made for this purpose and installed using enhanced attachment methods, are often used on these roofs, but it’s also common to see the base flashing at the walls simply be a foot or so of the field membrane turned up the wall and fastened in place with rivets through a termination bar along the top edge of the membrane.
This termination bar is often also used to simultaneously secure a strip of counter-flashing with a sealant trough that protects the top edge of the base flashing from the weather.
Some contractors will simply use a termination bar that has its own sealant trough (as in the detail below) and will not use a separate piece of counter-flashing. This should not be considered optimal and a separate counter-flashing component should be specified if possible.
Counter-flashing can be installed separately, and when it is, it should be installed an inch or so above the top of the base flashing termination, with its own rivets and sealant (see the next drawing below). This is preferable because it provides much better (the belt-and-suspenders thing) protection, but of course it costs more to do it this way.
Regardless, the base flashing should always have a strip of compressive sealant tape along the back of its top edge as a last line of defense if the sealant fails.
The counter-flashing at a tilt-wall is almost always surface-mounted, that is, there is almost never a reglet or cut made in the wall so that the top of the counter-flashing can be inserted into the wall for long-term weather protection that does not depend on sealant. It is very difficult to make a clean cut in the dense concrete that tilt-up panels are made from, and because tilt-up panels are structural building components (unlike roofs), it’s not a good idea to have roofers mess with them beyond installing rivets.
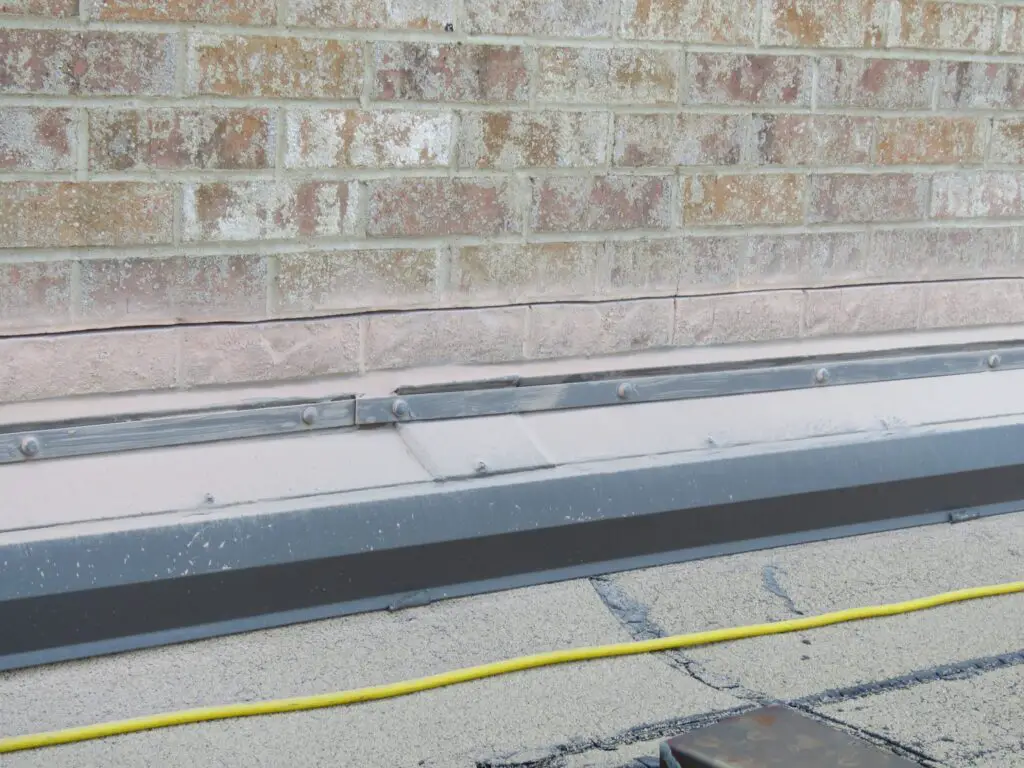
Instead of having reglet inserted into a raggle, the surface-mounted counter-flashing has a simple sealant trough along the top which is filled with building sealant.
This application of sealant is therefore the primary defense against rainwater running down the wall and entering the roof system behind the base flashing.
Of course, this method is far faster and cheaper to install than any other type of perimeter flashing termination system. The big drawback is that the entire perimeter of the roof depends on sealant to keep water out of the roof system.
Building sealant fails as a matter of course. Periodic failure and the need to remove it and replace it is an inherent aspect of building sealant. Sealant is a permanent maintenance item that needs to be inspected on a yearly basis, and replaced every 5 to 15 years.

A much better perimeter edge detail, in terms of long-term roof performance, is to run the roof membrane up to the top of the parapet, or even up and across the top of the wall, and use a metal coping system to protect the flashing.
This takes sealant out of the equation, and not only reduces future maintenance costs, but greatly reduces the chances of roof leaks and their associated repair costs.
But this adds labor and material costs to the initial construction, and most contractors will avoid doing this unless the contract documents specifically call for it.
If a professional roof consultant is involved with the project, they will often push to terminate the flashing under a wall coping system, with an eye on future roof performance, but they don’t always get their way.
Roof Issues Related to Tilt-Up Walls
Failure to Maintain the Sealant
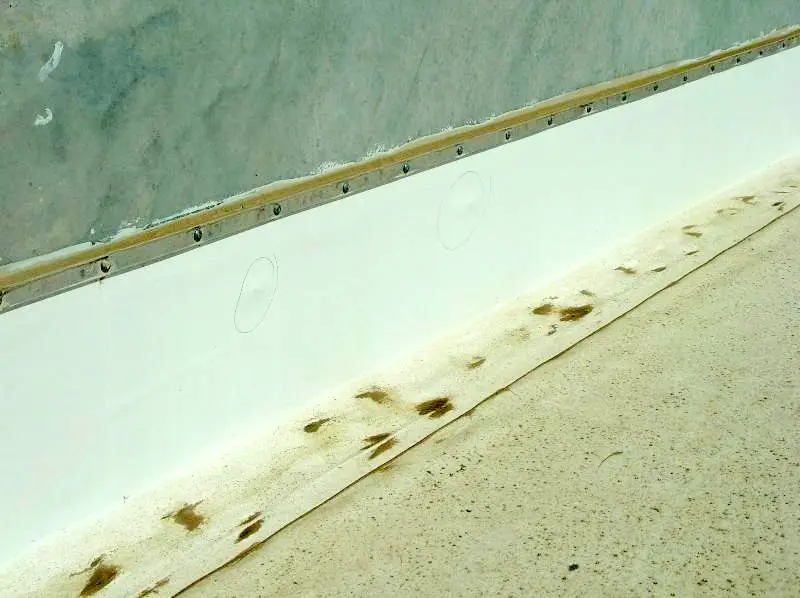
The most common roof issue related to tilt-up walls is the maintenance required to keep the roof leak-free along the entire perimeter of the roof due to roof installation methods that rely heavily on building sealant to keep water out of the roof system.
These roofs typically have hundreds or thousands of lineal feet of sealant serving as the main line of defense against water infiltration at the edges of the roof. The sealants used typically last from 5 to 15 years before needing to be replaced.
Due to the harsh environment (UV rays, extreme heat), sealants fail more quickly on a roof than they would in a more protected environment. Sealant will shrink, harden, crack, and pull away from the substrate over time.
The most common sealant used is a polyurethane sealant called NP-1, although longer-lasting (and more expensive) sealants are available.
The sealant should be inspected at least once a year and any deteriorated sealant should be properly removed and replaced as soon as possible after it’s identified.
Failure to inspect, remove, and replace deteriorated sealant at the walls will lead to roof leaks and the associated (and preventable) expenses.
Another common sealant-related issue you might see with tilt-up wall panels is adhesion failure. That is, sometimes the sealant doesn’t stick to the concrete.
Improper Substrate Preparation before Applying Sealant
A common reason for this is the failure to properly clean the concrete substrate before applying the caulk. Parapet walls are almost always covered with a fine layer of dust.
If the dust isn’t removed, the sealant sticks to the dust, not the concrete. Improper substrate preparation is probably the biggest cause of premature sealant failure, always and everywhere.
Applying Sealant Too Soon on New Buildings
Adhesion failure at the termination bar or counter-flashing is often seen on new buildings where the sealant has been applied too soon during the initial roof installation.
Although the tilt-up panels will have normally cured enough to be raised and put in place within a week after pouring, the concrete continues to release a significant amount of moisture for about a month after they are installed.
If the roof is installed during this period, the concrete will not be a suitable substrate for the sealant. A properly-written project manual will insist that the concrete be allowed to cure for at least 28 days before sealant is applied.
When the sealant fails to adhere due to damp concrete, the result is typically long stretches of wall where the sealant looks perfectly fine, but actually isn’t.
In some cases, you can take a business card, insert it down behind the sealant, and run it along the wall like that for dozens of feet before it is blocked by a patch of functioning sealant.
This is an expensive issue to resolve, due to the large amount of material that will need to be replaced, and the fact that new sealant is harder to remove than old sealant, meaning the job will take longer.
Sealant at the Wall Joints
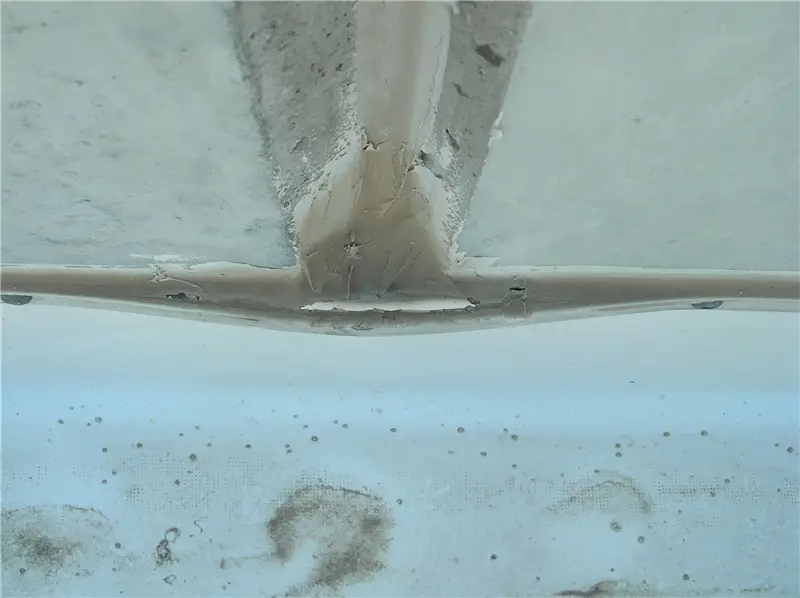
The joints between the tilt-up panels are also made waterproof with sealant (applied over backer rod inserted into the joints).
The tops of the wall panels commonly extend a couple of feet above the height of the roof perimeter flashing, and so do the joints between the panels. This creates another avenue for water to enter the roof system.
Compromised sealant in the panel joints above the wall flashing allows water to enter the wall above the roof and run down behind the flashings.
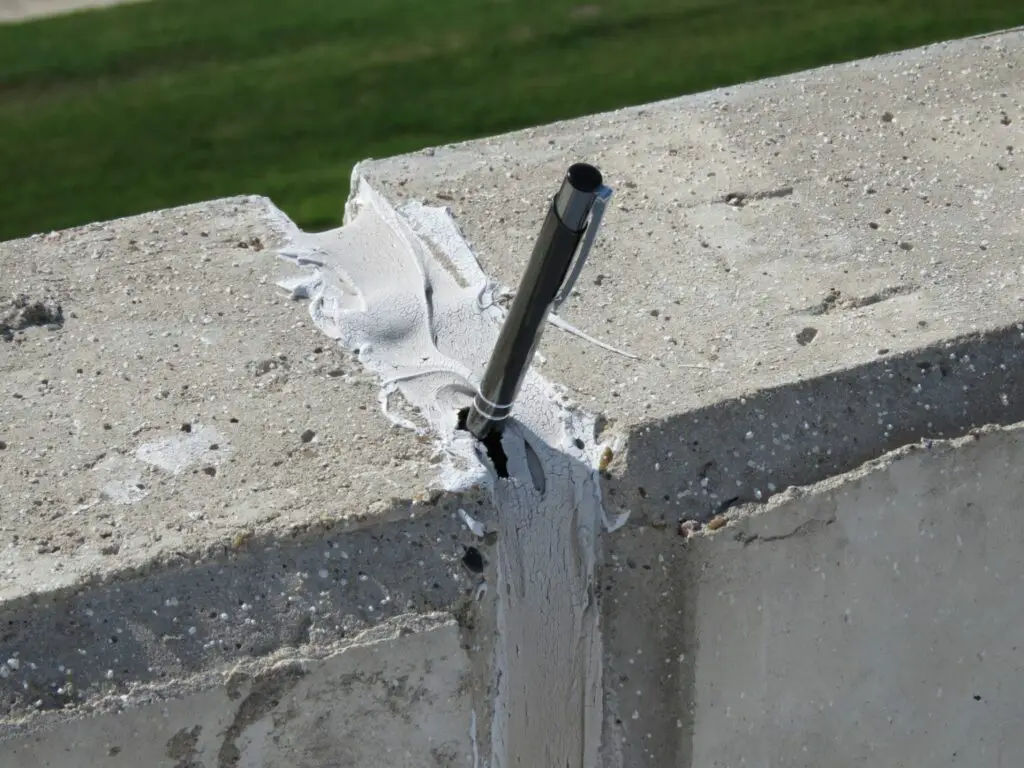
Age-related sealant deterioration is not the only thing to look out for here. Even the slightest building settlement will cause differential movement between the panels on each side of a sealant joint.
This frequently leads to cohesive failure of the sealant (where the sealant gets pulled apart). The most common evidence of this is a large hole in the sealant at the top of the wall.
Building Settlement
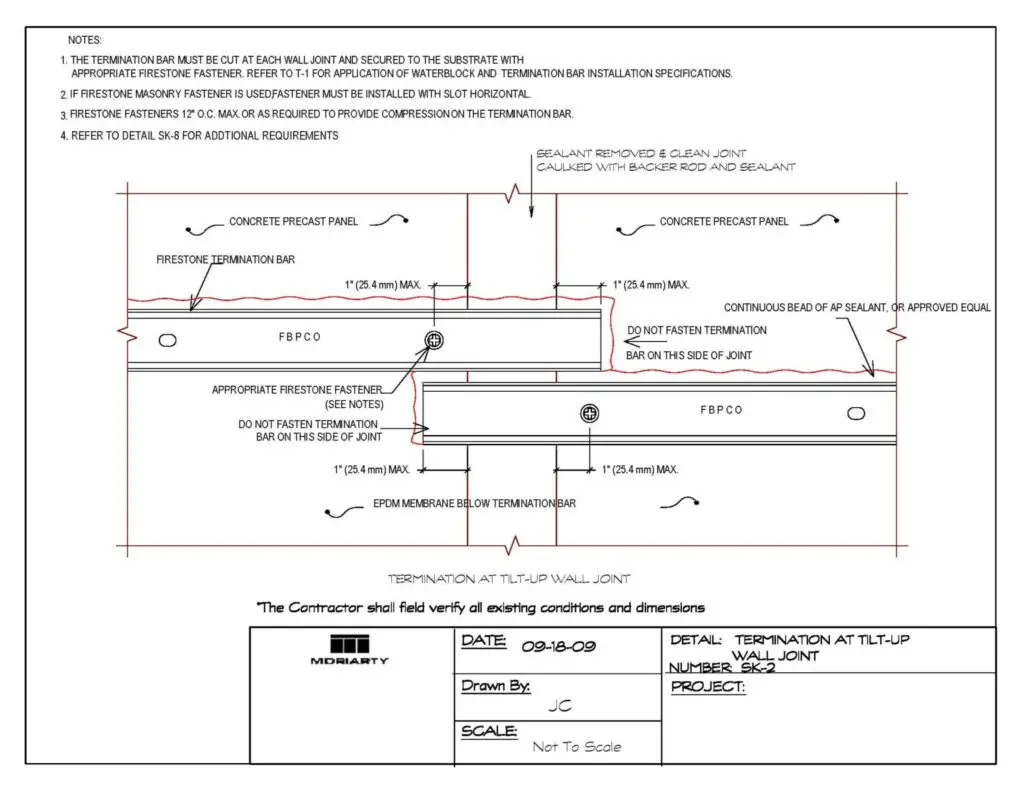
Besides sealant failure at the wall panel joints, building settlement and differential movement between the wall panels can lead to a particularly serious roof issue on a tilt-up building.
When one panel settles one way and the panel next to it settles another way, it can snap or deform termination bar and metal counter-flashing which improperly spans the wall joints.
No individual piece of termination bar or counter-flashing should ever be fastened to the wall on both sides of a tilt-wall joint.
All roofing contractors should know this, but you still see it happen. And when it does, the force of the ever-so-slightly moving tilt-up panels will either bend the termination bar or pop out the rivets securing the bar on one side of the joint or the other.
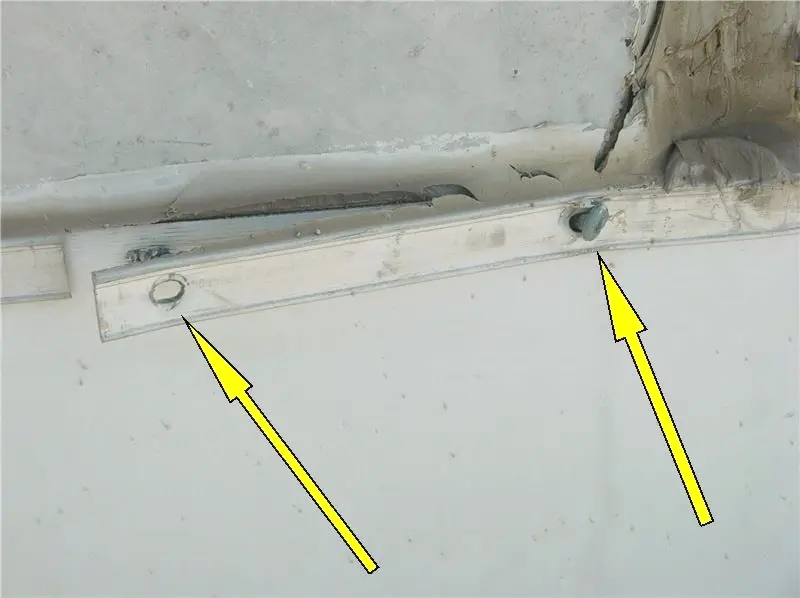
When that happens the top of the flashing at that location can end up wide open, with no protection from the weather, providing rainwater a clear path into the building.
The proper way to install termination bar or counter-flashing at a tilt-up wall joint can be seen in the detail below.
References for Tilt-Up Wall Construction
1. General: For a very brief overview of tilt-up construction, see the Tilt-Up Concrete section of the Applications of Cement page on the website of the Portland Cement Association.
2. General: A slightly more in-depth explanation of the tilt-up technique is available on the Wikipedia “Tilt up” page.
3. General: “Tilt-Up Construction Basics” provides a thorough overview of the subject. Available on the website of the Tilt-Up Concrete Association.
4. General: “TILT-UP TODAY, a publication of the Tilt-Up Concrete Association, is THE source for Tilt-Up industry news, market intelligence, business strategies, technical solutions, product information, and other resources for professionals in the Tilt-Up industry.”
5. Technical: “Connections in Tilt-Up Buildings” is an article in “Tilt-Up Today” that discusses, in useful detail, how tilt-up buildings are put together.

About the Author
Jack Gray spent 20 years as a principal roof consultant with the Moriarty Corporation, an award-winning building enclosure consultant firm founded in 1967. Mr. Gray has worked in the roofing industry for over 25 years, with training and practical experience in roof installation, roof inspection, roof safety, roof condition assessment, construction estimating, roof design & specification, quality assurance, roof maintenance & repair, and roof asset management. He was awarded the Registered Roof Observer (RRO) professional credential in 2009. He also served as an infantry paratrooper in the 82nd Airborne Division and has a B.A. from Cornell University.