I participate in the Amazon affiliate program and may earn commissions from purchases made through links on this page.
Table of Contents
Introduction
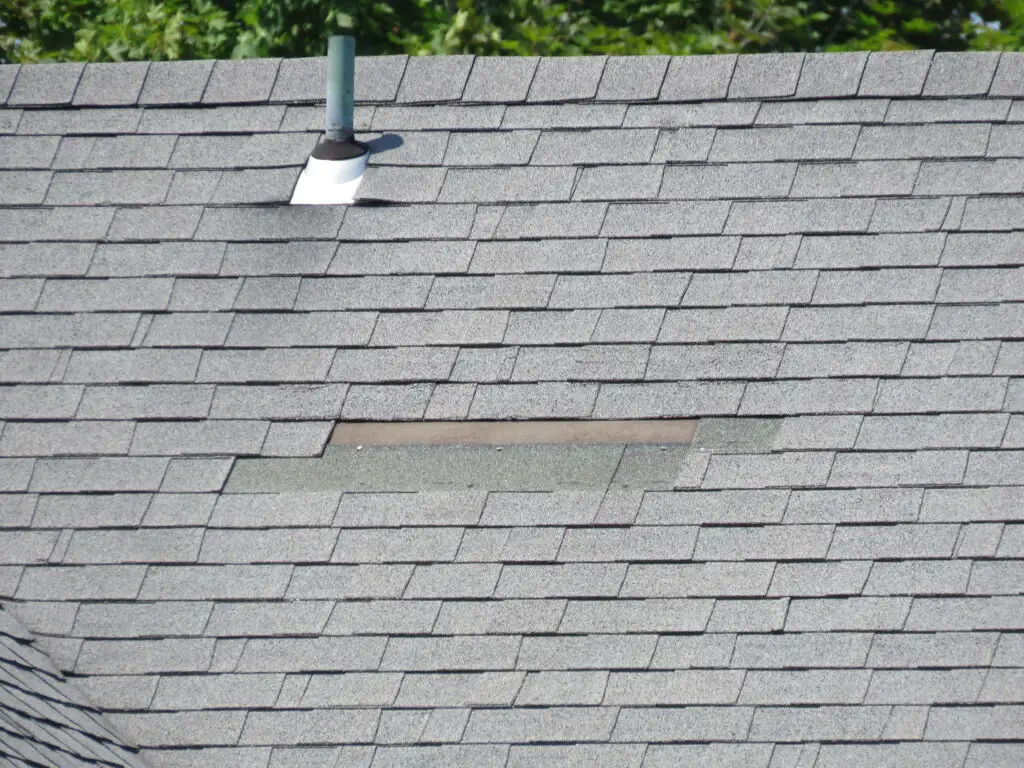
A missing asphalt shingle might seem like a minor issue, but it can lead to serious roof damage if it isn’t fixed. A missing shingle exposes the underlayment and sheathing to water, increasing the risk of leaks, rot, and mold growth. Replacing a missing shingle is a fairly simple repair that many homeowners will be able handle with the right tools and a bit of patience.
This step-by-step guide will walk you through the job.
Tips for Success
✅ Check the weather: Install shingles when temperatures are above 50°F (10°C) to prevent cracking.
✅ Match your shingles: Try to use the same brand and color to ensure uniformity. If that’s unavailable, find something that matches as closely as possible.
✅ Don’t skip the roof cement: Properly applying roof cement prevents wind uplift and water infiltration.
✅ Secure edges in high-wind areas: If your region is prone to strong winds, consider adding extra nails or a small additional continuous bead of roof cement along the bottom edge or rake edge of the shingle.
🔴 CAUTION: Always follow roofing safety guidelines when working on a roof.
🔴 CAUTION: Never attempt repairs when thunderstorms are within 20 miles or during high winds, wet conditions, or extreme cold. Wet roof surfaces are very, very slippery, and asphalt shingles are prone to cracking in cold temperatures.
What You Will Need
Tools
- Shingle Removal Tool (also called a “shingle ripper”) – See on Amazon
- or Wonder Bar – See on Amazon
- Hammer – See on Amazon
- Metal Straight Edge (Framing Square) – See on Amazon
- Utility Knife – See on Amazon
- or (easier) Long-Handled Tin Snips – See on Amazon
- Trowel – See on Amazon or Caulk Gun – See on Amazon
Materials
- Asphalt Shingle to Match Existing Shingles (check Home Depot or Lowes)
- Roof Cement, Trowel-Applied – See on Amazon
- or Roof Cement, Caulk Gun-Applied – See on Amazon
- Roofing Nails – See on Amazon
How to Replace a Missing Asphalt Shingle
Step-by-Step Instructions
Step 1: Inspect the Area
Before installing a new shingle, check the exposed section of the roof. Look for:
- Loose nails that need to be removed
- Torn or damaged underlayment that may require repair
- Soft spots in the decking, which could indicate water damage
If you find significant damage, repair the underlayment or decking before proceeding.
Step 2: Lift the Overlapping Shingle Above
- Gently lift the existing shingles right above the area where the shingle is missing (the shingles that used to overlap the missing shingle). You may need to use the end of the shingle ripper or a pry bar to slowly and carefully break the seal where the existing overlapping shingles are still bonded to the shingles adjacent to the missing shingle.
- CAUTION: Do not over-lift the existing in-place shingles. Shingles become more flexible in warm weather, so repairs are best performed when temperatures are above 50°F (10°C). In colder temperatures, shingles can crack when bent. If working in cooler weather, use a hair dryer or heat gun on a low setting to warm the shingles slightly before lifting.
- If working in cooler weather and the shingles feel stiff, you can use a hair dryer or a heat gun on a low setting to warm them up.
Step 3: Remove Old Nails and Debris
- Use the shingle ripper, hooked flat bar, or a claw hammer to pull out any remaining nails or pieces of the old shingle from the area where the missing shingle was. Be careful not to damage the roofing felt/underlayment.
- Brush or scrape away any debris, old roofing cement, or dirt to make sure the new shingle can lay flat.
- Inspect the exposed area for damage. Check for torn underlayment, loose nails, or soft sheathing, which could indicate water damage. If the roof deck is compromised, it should be repaired before installing the new shingle.
Step 4: Slide the New Shingle into Place
- Slip the new shingle into place under the lifted shingle(s) above the location of the missing shingle. If the shingle sticks or catches on something, use shears (long-handled tin snips, they work much better than a knife) or a utility knife to trim back the top corners of the new shingle. This should make it much easier to slide into place.
- Ensure that the new shingle aligns properly with the shingles to the left and right, matching the exposure of the adjacent shingle tabs to maintain a uniform appearance.
Step 5: Secure the Shingle with Nails
- Nail the new shingle in place using at least four nails (or more, if specified by the manufacturer).
- Use corrosion-resistant roofing nails (#11 or #12 gauge aluminum or galvanized barbed ring shank nails) with heads between 3/8-inch to 7/8-inch in diameter.
- Nails should be placed just below where the existing adhesive strip (sealant line) on the overlapping shingle will be when that shingle lies back down on top of the new shingle.
- The nails should penetrate wood plank decks at least 1 inch or extend completely through plywood or OSB decks.
- Do not use staples; they do not provide sufficient holding strength.
Step 6: Seal the Nails with Roof Cement
- Cover the nail heads with a 1-inch wide spot application of roofing cement over each nail head to protect against water intrusion.
Step 7: Apply Roof Cement to the Bottom of the Lifted Single(s)
- This step is performed to reseal the shingles in order to prevent future wind damage.
- Apply five similar spot applications of roof cement (one in each corner and three evenly spaced along the bottom edges) to the underside of the lifted shingles that will sit on top of the new shingle. Each spot should be about the size of a quarter.
- Keep the spots of roof cement about 1 inch back from the edges to prevent excess cement from oozing out and becoming visible when you press those shingles back down on the new shingle.
Step 8: Press the Shingle Down
- Carefully lower the overlapping shingle onto the new shingle.
- Firmly press the tabs down to ensure adhesion.
Extra Steps for a Missing Shingle Along the Rake Edge
Shingles along the rake edge (the sloped edge of the roof) are more exposed to wind uplift forces and water infiltration due to wind-driven rain, making their proper replacement especially important. Shingles along the rake edge may not be full width; they are often trimmed during roof installations to allow the shingle courses to be properly staggered. You may need to trim your replacement shingle so it will fit.
Follow all of the steps above but also perform these additional steps:
Extra Step 1: Inspect the Rake Edge for Damage
- Ensure that the metal drip edge flashing (if present) is intact and properly secured. If it’s bent or loose, nail it back in place before proceeding.
Extra Step 2: Measure the Width of the Area
- Measure the width of the area where the missing shingle was. There’s a good chance it wasn’t a full-width shingle.
- If it wasn’t, you need to trim your new shingle to fit.
Extra Step 3: Trim the New Shingle to Fit
- Mark the line where you will cut using a straightedge (a metal framing square is best) and chalk or a crayon.
- Cut with shears, tin snips, or a utility knife:
- Long-handled tin snips are easier to use and provide a cleaner cut, especially for thicker architectural shingles.
- A utility knife with a fresh blade can be used by scoring the shingle on the granulated side several times until you go deep enough to cut the reinforcement fabric in the middle of the shingle. It helps if you use a metal framing square to guide the knife. Once you’ve cut deep enough, you should be able to snap the shingle along the line by folding it and unfolding it repeatedly.
- Round off the corners slightly – this prevents the new shingle from catching wind or curling up prematurely. It will also help you slide it into place.
Extra Step 4: Apply Extra Roof Cement
Remember that shingles along the rake edge (the sloped edge of the roof) are more exposed to wind uplift forces and water infiltration due to wind-driven rain than other shingles. The application of additional roof cement described here is a common technique for counteracting that wind and rain.
- Apply roof cement as described above, but also:
- Apply an additional bead of roof cement under the entire rake edge of the overlapping shingle and under the rake edge of the new shingle. This bead of roof cement should be applied back 1 inch from the edge, so it doesn’t ooze out when you press the shingles into place.

About the Author
Jack Gray spent 20 years as a principal roof consultant with the Moriarty Corporation, an award-winning building enclosure consultant firm founded in 1967. Mr. Gray has worked in the roofing industry for over 25 years, with training and practical experience in roof installation, roof inspection, roof safety, roof condition assessment, construction estimating, roof design & specification, quality assurance, roof maintenance & repair, and roof asset management. He was awarded the Registered Roof Observer (RRO) professional credential in 2009. He also served as an infantry paratrooper in the 82nd Airborne Division and has a B.A. from Cornell University.